How to Do Nail Art for Beginners: A Step-by-Step Guide
Doing nail art for beginners starts with understanding the basics of nail preparation, choosing the right tools, and experimenting with simple designs. By mastering a few easy techniques like dotting and striping, you can achieve attractive nail art without professional skills.
Nail art enhances your style and creativity, offering a fun way to customize your look. For beginners, committing to small designs helps build confidence and familiarizes you with different nail polishes, brushes, and decoration methods.
This article will guide you through essential materials, beginner-friendly nail art methods, and tips for practice. It will also cover common mistakes to avoid, basic design inspiration, and product recommendations to kickstart your nail art journey.
Essential Tools and Materials for Nail Art

Basic Nail Art Tools Every Beginner Needs
Starting nail art requires a few fundamental tools: a good base coat, various colored nail polishes, dotting tools, thin brushes, and a topcoat. These basics help in creating clean lines, dots, and protect your designs from chipping.
Additionally, a nail file, cuticle stick, and cotton pads for clean-ups are essential. Investing in simple tools allows you to try multiple designs while keeping the process manageable and enjoyable.
- Base coat and topcoat
- Colored nail polishes
- Dotting tools and striping brushes
- Nail file and cuticle pusher
Optional Supplies to Enhance Your Designs
As you progress, items like nail stickers, rhinestones, stamping kits, and nail tape can add flair to your creations. These allow you to experiment with textures and patterns beyond hand-painted designs.
While not mandatory, these tools shorten the time needed to achieve complex looks and boost creativity. Beginners will find nail stickers and tape easiest to integrate at the start.
- Nail art stickers and decals
- Rhinestones and gems
- Stamping plates and polish
- Nail tapes for geometric designs
Preparing Your Nails for a Perfect Canvas

Cleaning and Shaping Nails
Trim and file your nails to the desired shape, typically round, square, or almond. Smoothing edges prevents accidental chipping and uneven polish application. Remove old polish using a gentle remover to avoid drying out nails.
Push back cuticles gently using a cuticle stick or orange wood stick. Healthy cuticles promote clean nail beds, making your nail art look more polished and lasting longer.
- Trim and file nails
- Remove old polish
- Push back cuticles gently
Applying Base Coat and Nail Polish
Base coats protect nails from staining, smooth the surface, and help polish adhere better. Apply a thin, even layer and let it dry fully before applying your chosen color.
Choose colors that complement your intended design. Two thin layers of color often provide better coverage than one thick coat, reducing drying time and preventing smudges.
- Use a clear base coat
- Apply two thin layers of color polish
Basic Techniques for Nail Art Beginners
Creating Dots and Stripes
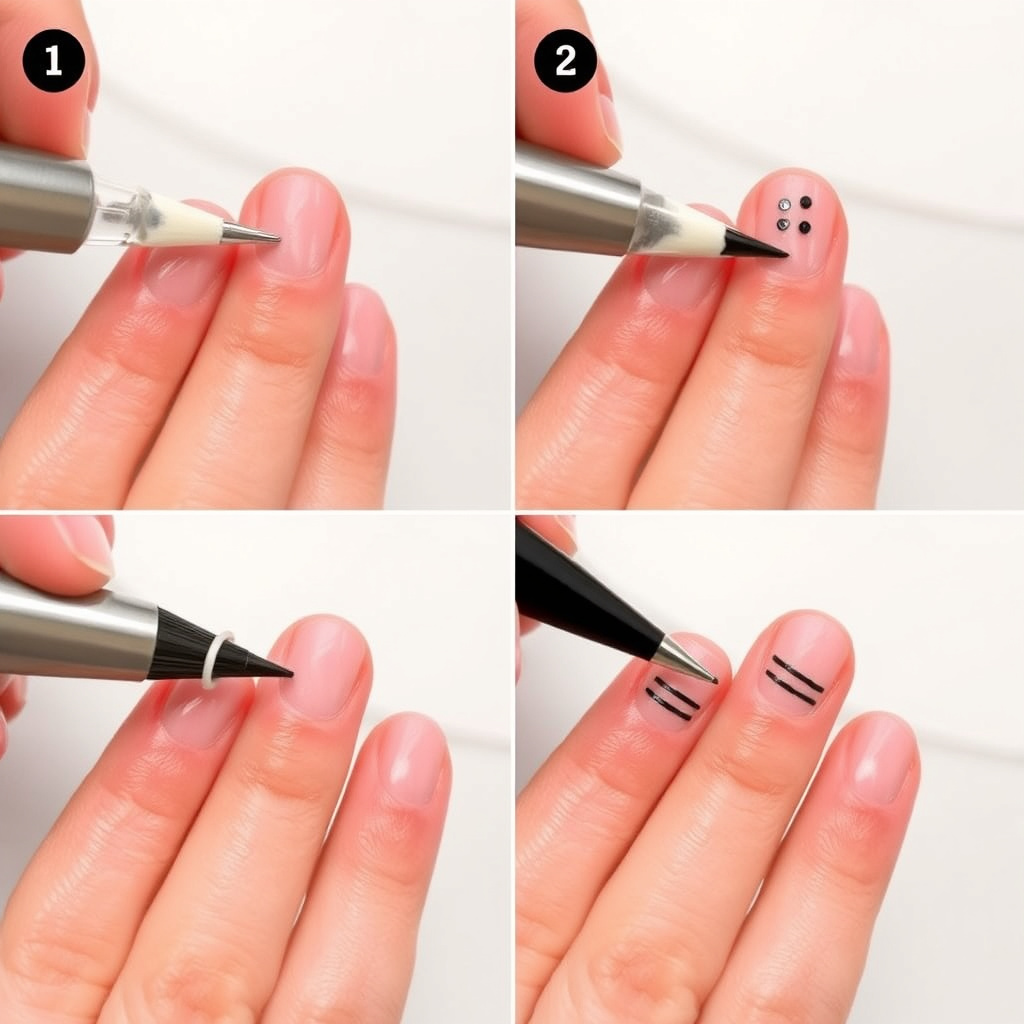
Dots can be made using a dotting tool or even a toothpick. Dip the tool into polish and apply gentle pressure on the nail to create uniform dots. This method is great for polka-dot or flower designs.
Stripes are created using thin striping brushes or nail tape as a stencil. Patience is key—steady hands make the difference. Combining dots and stripes unlocks many simple pattern possibilities.
- Use dotting tools or toothpicks
- Apply striping tape or thin brushes for lines
Using Sponges and Stamping
Sponging lets you blend colors for gradient or ombré effects. Apply multiple polish colors to a makeup sponge and tap the nail gently to transfer the gradient.
Stamping kits include engraved plates and a stamper to quickly transfer detailed patterns. Beginners benefit from stamps for intricate designs otherwise difficult to paint freehand.
- Sponge for gradient effects
- Stamping kits for detailed patterns
Maintaining and Caring for Your Nail Art

Applying Topcoat and Drying Best Practices
A topcoat seals your design and adds a glossy finish. Apply it carefully after the design fully dries, extending its lifespan and protecting it from chips or scratches.
Allow your nails to dry completely, avoiding contact with water or smudging. Using quick-dry sprays or drops can accelerate this process.
- Apply clear topcoat
- Avoid water while drying
- Consider quick-dry sprays
Removing Nail Art Safely
Use an acetone-based remover for glitters or heavy designs, but moisturize nails afterwards to prevent brittleness. For simpler polish, non-acetone removers preserve nail moisture better.
Avoid peeling or forceful scraping of designs, as this damages the natural nail surface over time.
- Use acetone removers for tough polish
- Moisturize after removal
- Avoid peeling polish
Inspiring Simple Nail Art Designs for Beginners

Classic Patterns: Polka Dots and Stripes
Polka dots are a timeless and approachable design for beginners. Using just two contrasting colors, you can create playful or elegant patterns with dots spaced evenly across nails.
Stripes bring a graphic touch and can be vertical, horizontal, or diagonal. Using tape makes stripes crisp and easy, perfect for simple nail art designs that stand out.
- Two contrasting polish colors
- Even spacing for dots
- Use tape for precise stripes
Floral and Gradient Looks
Flower patterns, composed of dots arranged into petals, offer a charming design using basic dotting techniques. These require minimal brushes and are quick to master.
Gradient nails blend two or three colors seamlessly. Sponging applications create smooth transitions, resulting in stylish yet beginner-friendly looks.
- Dotting petals for flowers
- Gradient blending with a sponge
Common Challenges and How to Overcome Them

Preventing Smudges and Chips
Smudging often occurs when nails haven't dried fully before use. To avoid this, paint nails in thin layers and give ample drying time between coats.
Applying a strong topcoat and wearing gloves during chores helps protect your designs from chipping prematurely.
- Thin layers of polish
- Wait between coats
- Use topcoat and gloves
Steadying Your Hand for Better Control
Rest your painting hand on a flat surface to minimize shaking. Taking slow, deliberate strokes increases precision for detail work.
Practicing basic shapes on paper or a practice wheel can also improve muscle memory before trying on nails.
- Rest hand on table
- Slow, deliberate strokes
- Practice on paper or practice wheel
Where to Find Resources and Inspiration

Online Tutorials and Videos
YouTube and nail art blogs offer extensive step-by-step tutorials for beginners. Watching videos helps you observe brush techniques and timing, easing the learning curve.
Many creators provide downloadable templates and lists of recommended products, making DIY nail art more accessible and enjoyable.
- YouTube tutorial channels
- Nail art blogs
- Downloadable templates
For a broader understanding of nail art history and techniques, refer to the nail art information on Wikipedia. Nail art information on Wikipedia.
Social Media and Community Inspiration
Instagram and Pinterest showcase thousands of nail art designs from beginners to pros. Following nail artists and hashtag searches reveals current trends and simple ideas adaptable to your skill level.
Participating in online forums or groups helps you get feedback and tips tailored to beginner challenges.
- Instagram nail artists
- Pinterest design boards
- Nail art forums and groups
Comparison of Nail Art Techniques for Beginners
Here's a quick overview comparing popular nail art techniques suitable for beginners, highlighting ease, tools needed, and typical design complexity.
| Technique | Ease of Use | Required Tools | Design Flexibility | Drying Time |
|---|---|---|---|---|
| Dotting | Very Easy | Dotting tool or toothpick | Limited to dots and simple patterns | Fast |
| Striping Tape | Easy | Nail tape and polish | Straight lines, geometric shapes | Medium |
| Stamping | Moderate | Stamping kit | Detailed patterns, repeatable | Fast |
| Sponging (Gradient) | Moderate | Makeup sponge | Smooth blending of colors | Medium |
| Freehand Brush | Hard | Thin nail brushes | Highly flexible but requires skill | Varies |
Frequently Asked Questions
What is the easiest nail art design for beginners?
Polka dots and stripes are the easiest for beginners since they require minimal tools and basic techniques that you can master quickly.
How long does nail art typically last?
With proper preparation and a quality topcoat, nail art can last up to one to two weeks without chipping or fading.
Can I use regular nail polish for nail art?
Yes, regular nail polish works well for nail art. However, some polishes may be thicker or thinner, affecting precision, so choose smooth formulas.
How do I fix mistakes in nail art?
Use a small brush dipped in nail polish remover to carefully clean mistakes. Patience and thin layers help prevent errors during application.
Is it necessary to invest in expensive nail art tools as a beginner?
No, beginners can start with affordable tools like toothpicks, regular brushes, and basic polishes. Upgrade tools as skills and interest grow.
Key Takeaways
- Start nail art by mastering basic tools and simple designs like dots and stripes.
- Proper nail preparation and a good base coat are essential for lasting designs.
- Gradually incorporate optional supplies like stickers and stamping kits to expand creativity.
- Practice steady hand techniques and use online resources for continual learning.
Conclusion
Approaching how to do nail art for beginners requires combining patience with practical tool use and simple techniques. The process begins with clean, well-shaped nails and a base coat before experimenting with designs like polka dots or stripes. Focusing on gradual progression—starting with easily controlled patterns and tools—helps build confidence and skill without overwhelming complexity.
For those ready to explore more, techniques like stamping or gradient sponging can add sophisticated effects while still being accessible. Products such as nail tapes and dotting tools enable transforming vast inspiration into real designs suited to your style. Remember that maintaining your art with a topcoat and proper drying contributes greatly to its durability. With familiarization, nail art evolves from a beginner’s hobby into a form of self-expression.
The best next step is to gather the basic materials outlined here and practice simple nail art designs regularly. Use online tutorials or social media platforms to observe new styles and gather ideas aligned with your comfort level. Starting small ensures enjoyable progress and helps you build the practical muscle memory needed for more intricate creations down the road.