How to Blend a Fade: Master the Seamless Haircut Technique
Blending a fade involves skillfully transitioning hair from short to longer lengths in a way that creates a smooth, seamless gradient without harsh lines. The key is using clippers and guards strategically to gradually reduce hair length while carefully blending overlapping sections.
Understanding how to blend a fade matters because a well-executed fade enhances hairstyle aesthetics and suits various hair types and personal styles. Poor blending can lead to obvious step marks or uneven patches that detract from the overall look, making mastering this technique a game-changer for barbers and enthusiasts alike.
This article covers essential tools, step-by-step blending methods, guard selections, and practical tips to achieve a flawless fade haircut. We'll explore various fade styles and compare blending techniques to help you improve your fade skills with confidence.
Essential Tools for Blending a Fade

Choosing the Right Clippers and Guards
High-quality clippers with adjustable blade lengths make blending a fade smooth and efficient. Using a variety of guard sizes allows for graduated hair length changes, pivotal in creating seamless transitions between sections.
Many professionals prefer clippers with variable speed settings and ergonomic designs for better control during blending. Guard numbers typically range from 0 (no guard) to 8, representing different hair lengths in millimeters or inches.
- Clippers with adjustable blades
- Multiple guard sizes (0 to 8)
- Ergonomic design for ease of use
Additional Tools to Enhance the Process
Complementary tools like a spray bottle keep hair damp for better control and cleaner fades. Combs and scissors assist in fine-tuning edges and blending difficult areas.
A handheld trimmer or edger helps define hairlines and clean up hard-to-reach spots, improving the overall fade appearance when blending transitions.
- Spray bottle for dampening hair
- Combs and scissors for detail work
- Trimmers for hairline definition
Fundamentals of Blending a Fade

Understanding Hair Length Gradation
Blending a fade requires a clear plan for the hair length progression, usually starting from very short at the nape and sides, gradually increasing towards the top. Effective blending avoids sudden changes by overlapping guard sizes in a stepped manner.
Visualizing the fade as a gradient helps determine where to place each guard size and how to blend the lines between different lengths using either clipper-over-comb or freehand techniques.
- Plan gradual length changes
- Use overlapping guard sizes
- Visualize length as a gradient
Basic Blending Techniques
Clipper-over-comb is a popular technique where the comb lifts hair sections while the clipper cuts along the comb's edge, allowing gradual blending especially on curved head areas.
Freehand blending uses clipper guards to trim sections progressively without a comb, requiring steady hands and a good eye to avoid harsh lines. Switching between techniques can yield the cleanest fade.
- Clipper-over-comb for smooth transitions
- Freehand guard blending
- Combine methods for best results
Step-by-Step Guide to Blend a Fade

Preparing the Hair and Sectioning
Start with clean, dry or slightly damp hair. Section the hair carefully, defining areas for the fade and top to maintain clarity during blending.
Use clips or comb partings to separate the top from the sides, making it easier to work on the fade without affecting other sections.
- Clean and slightly damp hair
- Section hair with clips or comb
- Define fade boundaries
For more on this, see our related guide: How to Cut a Mid Fade: Step-by-Step Guide for a Perfect Blend.
Executing the Fade Blend
Begin with the shortest guard at the base of the neck and sides, moving clippers upwards in smooth strokes. Progressively switch to longer guards as you move toward the crown, blending any lines between guard changes horizontally and vertically.
Constantly check in mirrors and use your hands to feel for uneven patches, correcting with clipper-over-comb or scissors over comb to seamlessly blend any harsh lines.
- Start with shortest guard at base
- Move upwards switching to longer guards
- Check and refine with comb and scissors
Advanced Blending Techniques for a Professional Fade

Using Tapers and Texturizing Tools
Tapering subtly reduces hair length near the edges, providing a clean finish to the fade. Texturizing shears or clipper blades can add dimension and blend uneven hair density.
These tools help remove bulk and soften transitions, especially useful for thick or curly hair where blending might be more challenging.
- Taper edges for clean finish
- Use texturizing shears for dimension
- Remove bulk for smoother fade
Refining with Razors and Detailing Trimmers
Straight razors offer precise control to sharpen fade edges around the hairline and neck, accentuating the fade’s clean look. Detailing trimmers target small fade inconsistencies hard to reach with clippers.
Careful razor work minimizes shadowing and lifts contrast between faded layers, elevating the fade’s professional feel.
- Straight razor for sharp hairline
- Detail trimmers for hard spots
- Enhance contrast between layers
Common Fade Styles and How Blending Varies
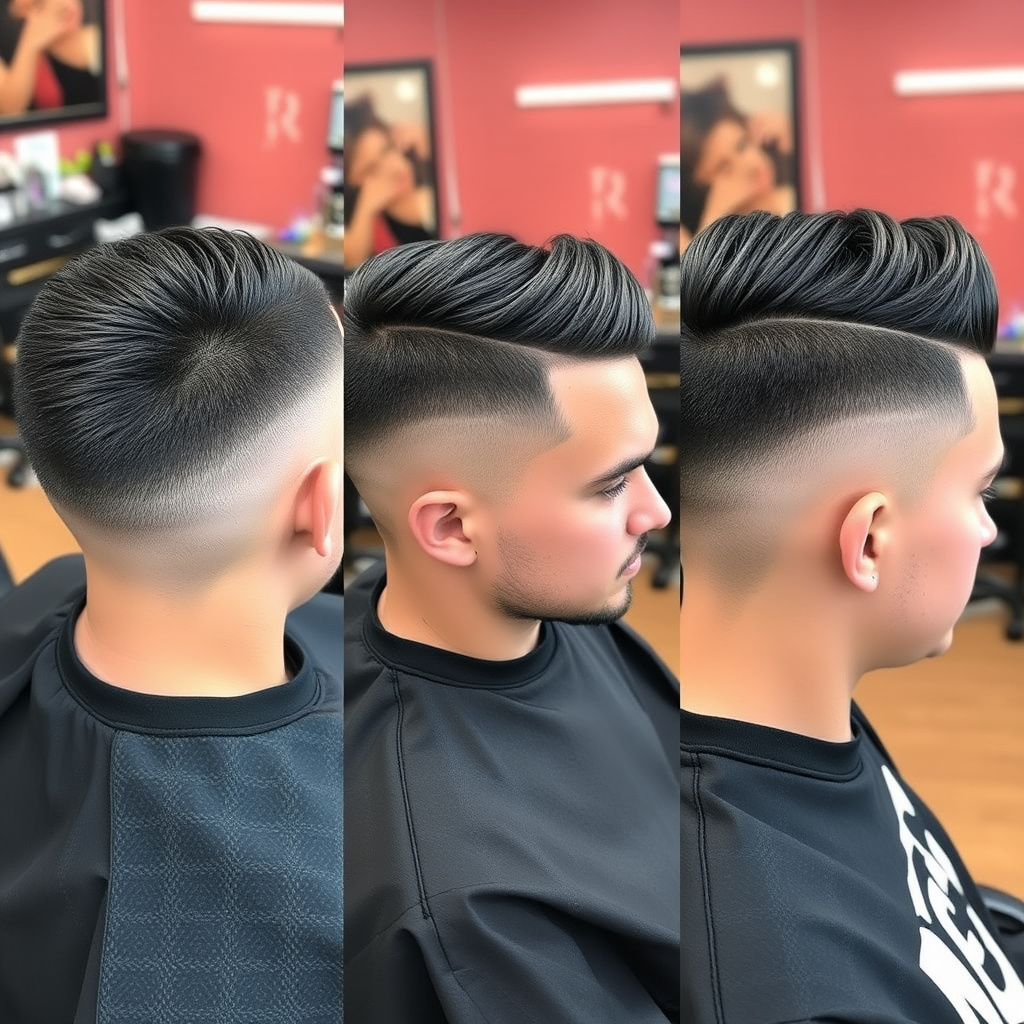
Skin Fade vs Low and Mid Fades
Skin fades start at the skin level and rise gradually, requiring very precise blending to avoid harsh demarcations. Low and mid fades begin higher on the head, offering more gradual blending opportunities.
Each fade type demands distinct blending techniques focused on the proximity to the scalp and transition height, which dictates clipper guard choices and stroke patterns.
- Skin fades start at skin level
- Low fades blend higher up
- Clippers and guards vary by fade type
For more on this, see our related guide: How to Cut a Fade with Clippers: A Step-by-Step Guide for Smooth Blends.
High Fade and Drop Fade Blending Nuances
High fades involve rapid length transitions near the crown, demanding careful speed and hand control to blend effectively. Drop fades curve around the head, requiring blending along a descending arc.
Both styles require practitioners to adapt blending strokes to head contours and fade shape to avoid unnatural lines or patches.
- Rapid blending in high fades
- Curved blending in drop fades
- Adapt strokes to fade shape
Tips for Maintaining a Blended Fade Post-Cut

Daily Care and Styling for Fade Longevity
Maintaining a fade requires regular washing, moisturizing, and styling with light hold products to keep hair controlled without disturbing the blend.
Use combs or brushes to nurture the fade shape and prevent unruly growth that masks blending quality.
- Regular washing and moisturizing
- Use light styling products
- Comb hair to preserve shape
For further historical and technical details about fades, you can visit the fade haircut Wikipedia page. fade haircut Wikipedia page.
Scheduling Touch-Ups and Trims
Frequent trims keep the fade sharp, with touch-ups every 1-2 weeks recommended for skin and high fades to maintain gradation clarity.
Communicate with your barber about fade upkeep to plan trimming intervals based on hair growth rate and style preference.
- Schedule trims every 1-2 weeks
- Discuss upkeep with your barber
- Adjust timing by hair growth
Fade Styles Category Comparison
Here's a breakdown comparing popular fade styles, highlighting length progression, blending difficulty, and maintenance frequency.
| Fade Style | Length Start Point | Blending Complexity | Maintenance Frequency |
|---|---|---|---|
| Skin Fade | Skin level | High | Every 1 week |
| Low Fade | Just above ears | Medium | Every 2-3 weeks |
| Mid Fade | Mid head | Medium | Every 2 weeks |
| High Fade | Near crown | High | Every 1-2 weeks |
| Drop Fade | Behind ear curve | High | Every 1-2 weeks |
Frequently Asked Questions
What clippers guard numbers are best for blending a fade?
Common guard choices include 0, 1, 2, 3, and 4, used in overlapping sequences to create smooth transitions. Starting from shortest at the base and gradually increasing guard size upward aids seamless blending.
How long does it take to learn how to blend a fade well?
With practice, basic fading blending can be learned within several weeks, but mastering smooth, professional fades often takes months of consistent hands-on experience and attention to detail.
Can I blend a fade on curly or thick hair?
Yes, blending fades on curly or thick hair requires extra care with clipper adjustments and texturizing tools to manage density. Slower, deliberate movements and smaller guard increments help achieve smoother fades.
How often should fades be maintained or trimmed?
Fades generally need trimming every 1 to 3 weeks depending on the fade type and hair growth speed. Skin fades demand more frequent touch-ups to keep the transition sharp.
What is the difference between clipper-over-comb and freehand blending?
Clipper-over-comb involves using a comb to lift hair while trimming, good for rounded areas and precise blending. Freehand blending uses guards on clippers without a comb, suited for straight sections and quicker fades.
Key Takeaways
- Blending a fade requires gradual length transitions using multiple clipper guards.
- Combining clipper-over-comb with freehand techniques enables smoother fades.
- Different fade styles demand unique blending approaches and maintenance schedules.
- Regular trims and proper styling preserve the blended fade’s clean appearance.
Conclusion
Successfully blending a fade is about controlling hair length progression and smoothing transitions between different guard sizes. Paying attention to head shape and hair type enhances the blend’s natural appearance. The methodical use of clippers, guards, and complementary tools leads to a professional finish without visible lines or patches.
If you prefer a subtle gradient, starting with a low or mid fade allows more blending space and slightly less precision time than a skin or high fade. Conversely, skin fades and high fades require careful, frequent touch-ups and rapid blending skills to maintain their sharp, close-to-skin look. Adapting your blending approach based on the fade style and hair texture is essential for the best results.
For best practice, begin with prepping clean hair and use progressively larger guards moving upward. Combine clipper-over-comb and freehand techniques to address problem areas. Maintain your fade post-cut with regular trimming and light styling products. Consistent practice and attention to detail will help you confidently master how to blend a fade.